AVR Microcontroller Class 2009: Difference between revisions
From HacDC Wiki
Hexagon5un (talk | contribs) |
No edit summary |
||
| (53 intermediate revisions by 7 users not shown) | |||
| Line 1: | Line 1: | ||
Syllabus, course material, homeworks, photos, etc from | Syllabus, course material, homeworks, photos, etc from a previous Introduction to Microcontrollers with AVR chips class can be found here. | ||
For the current class, head on over to [[AVR Microcontroller Class 2011]] | |||
Also see (and contribute to) [[Useful AVR Links]] | Also see (and contribute to) [[Useful AVR Links]] | ||
| Line 15: | Line 17: | ||
'''Resources''': | '''Resources''': | ||
* Slides from class: [[Media:class0.pdf]] | * Slides from class: [[Media:class0.pdf]] | ||
* ATmega48P Datasheets: [http://www.atmel.com/dyn/resources/prod_documents/8025S.pdf ATmega48P Summary Datasheet] and [http://www.atmel.com/dyn/resources/prod_documents/doc8025.pdf The Long ATmega48P Datasheet] | * ATmega48P Datasheets (get both): [http://www.atmel.com/dyn/resources/prod_documents/8025S.pdf ATmega48P Summary Datasheet] and [http://www.atmel.com/dyn/resources/prod_documents/doc8025.pdf The Long ATmega48P Datasheet] | ||
* Download the software part of the toolchain: For Mac folks: [http://www.obdev.at/products/avrmacpack/index.html AVR Mac Pack]. For Windows folks: [http://winavr.sourceforge.net/ WinAVR]. For Ubuntu linux folks: "sudo apt-get install build-essential avr-libc binutils-avr gcc-avr avrdude" | * Download the software part of the toolchain: For Mac folks: [http://www.obdev.at/products/avrmacpack/index.html AVR Mac Pack]. For Windows folks: [http://winavr.sourceforge.net/ WinAVR] and the Atmel IDE [http://www.atmel.com/dyn/products/tools_card.asp?tool_id=2725 AVR Studio]. For Ubuntu linux folks: "sudo apt-get install build-essential avr-libc binutils-avr gcc-avr avrdude" | ||
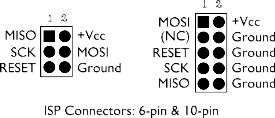
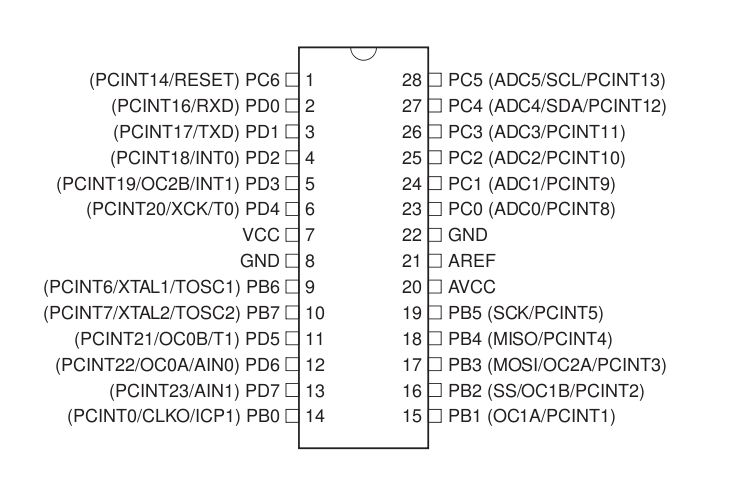
* Programmer and mega48 pinouts: [[Image:FFVH7HBF5UO1JMR.MEDIUM.jpg]] [[Image:Screenshot-ATmega48-88-168.png|320px]] | * Programmer and mega48 pinouts: [[Image:FFVH7HBF5UO1JMR.MEDIUM.jpg]] [[Image:Screenshot-ATmega48-88-168.png|320px]] | ||
== Class 1: | == Class 1: Programmer Hookup and Hello World LED Blinking == | ||
Lecture on how the programmer works -- simple serial interface basics. Some basics on avrdude / GCC tools. Hook up the programming interface wire-by-wire to the Mega48 chip and flash it with a simple program. Then hook up an LED to the output port and watch it blink! | |||
'''Resources''' | |||
* [http://elliotwilliams.org/avrclass/helloWorld.zip helloWorld.zip ] | |||
* Class notes: [[Media:class1.pdf]] | |||
* Wiring Diagram: [[Image:wiring.png|520px]] | |||
'''Homeworks''' | |||
* Your kit has 10 resistors and 10 LEDs. If you want, you can solder them together to make [AVR: LED Blinkenlights]. | |||
* If you didn't already, make labels for the signal wires. Think of an easy way to remember which go where (into the 6-pin or 10-pin header). And/or make permanent programmer "pigtails" by soldering the signal wires to a 2x3 header in the correct orientation (headers available in the HacDC hackersmart for pennies). | |||
* Play around with the delays in the LED_Demo.c code. Make the blinking faster or slower. Experiment with on time and off time. | |||
== Class 2: Outputs: Bit Math, Cylon Eyes, and PWM Fading == | |||
How to make chips speak to the outside world, pin-by-pin. Enough C | How to make chips speak to the outside world, pin-by-pin. Enough C | ||
bitwise-math operations to make it work. Pulse-width | |||
modulation. | modulation. | ||
Labs: Cylon eyes and dimming LED's. Extra credit: cross-fading cylon | Labs: Visualizing bytes, Cylon eyes, and dimming LED's. Extra credit: cross-fading cylon | ||
eyes! | eyes! | ||
'''Resources''' | |||
* [http://elliotwilliams.org/avrclass/registers.zip registers.zip ] | |||
* [http://elliotwilliams.org/avrclass/cylonEyes.zip cylonEyes.zip ] | |||
* [http://elliotwilliams.org/avrclass/introPWM.zip introPWM.zip] | |||
* Class notes: [[Media:class2.pdf]] | |||
'''Homework''' | |||
* So you can make various lights blink and/or dim. Now what? Cross-fading cylon eyes? Patterns? Something groovy? | |||
* Note that you've got an 8-bit display if you're willing to read out numbers in binary. Useful for debugging later on, for sure. What else? Binary clock? Simple upcounter? Display "random" numbers? | |||
* If you could swing it around, you'd be on your way to a [http://www.ladyada.net/make/minipov3/index.html POV toy]. | |||
== Class 3: Inputs: Buttons == | |||
Gather data from the world. The lecture ended up being just on digital input. | |||
Labs: One note organ | |||
[[Media: class3.pdf]] | |||
== Class 4: Inputs: Debouncing and Analog-to-Digital conversion (ADC) == | |||
This class, we'll get to debouncing our button input, and reading in continuous voltages | |||
For more info on ADC stuff, see [http://www.avrfreaks.net/index.php?module=Freaks%20Files&func=viewFile&id=383&showinfo=1 this note] | |||
Labs: pushbutton organ, light-dependent theremin. | |||
[[Media: class4.pdf]] | |||
<br> | |||
[[Media: debouncedMusicbox.zip]] | |||
<br> | |||
[[Media: lightDependentTheremin.zip]] | |||
== Class 5: Serial I/O and Interrupts I == | |||
Laptop, meet AVR. AVR, laptop. Serial communication (plus serial-to-USB cable) lets you connect your micro to about anything, including your computer. Interrupts let the hardware (pins, serial port, timers, etc) call run functions for you, with the main body of your code picking up where you left off. Combine the two, and you can get pushbutton control of an AVR from your laptop keyboard. | |||
[[Media: helloSerial.zip]] | |||
<br> | |||
[[Media: helloInterrupts.zip]] | |||
<br> | |||
[[Media: class5.pdf]] | |||
<br> | |||
And as a bonus, if you run Python, [http://www.jerkpile.com/serialScope.py serialScope.py] provides a helpful debugging tool and an example of how simple USB/Serial code can be on the laptop side. Coupled with on-chip ADC, it's a (low speed, sideways) serial oscilloscope. Otherwise, a handy debugging aide. | |||
'''Homework:''' Take the scale.h from last class, and using input from your laptop, make a full keyboard out of the AVR plus speaker. Or write a ROT-13 device that takes your input and returns the encoded version. | |||
== Class | == Class 6: Timers/Counters and Interrupts II == | ||
Timers/counters let you do precision things with time. Fix up that nasty audio tone from the LDR theremin. Precise timing allows you to use LED's as light sensors. It's also good for making quality analog output and for directing servo motors. Interrupts + timers = deluxe PWM. Or give your AVR a solid internal timebase. (You know you want to.) | |||
let you time | In this class, we'll scratch the surface of what you can do with timers. | ||
[[Media: timerPWM.zip]] | |||
[[Media: timerPWM_ctc_hardware_toggle.c]] | |||
== Extra Credit: I2C == | |||
Talked a bit about the I2C serial protocol -- a light-weight serial multi-master bus using two wires (plus ground) and capable of addressing 127 different devices. Great for connecting to all sorts of peripherals. | |||
Demoed an $20 I2C 3-axis accelerometer using bare-minimum I2C code, with none of the error-checking that the pro's would do. But it works a charm. That's why it's called hacking, baby! | |||
[[Media: i2c_class.pdf]] | |||
[[Media: i2c_accelerometer.zip]] | |||
[[Category:AVR_Class]] | |||
Latest revision as of 20:46, 3 April 2012
Syllabus, course material, homeworks, photos, etc from a previous Introduction to Microcontrollers with AVR chips class can be found here.
For the current class, head on over to AVR Microcontroller Class 2011
Also see (and contribute to) Useful AVR Links
Class 0: Introduction and Setup
What the AVRs are, what all the pins do, what they can do for you. Then the toolchain: soldering together the programmer kits, getting the software up and running.
Labs: building the kit and running a test LED flasher. (Almost all lab today, little talk.)
Resources:
- Slides from class: Media:class0.pdf
- ATmega48P Datasheets (get both): ATmega48P Summary Datasheet and The Long ATmega48P Datasheet
- Download the software part of the toolchain: For Mac folks: AVR Mac Pack. For Windows folks: WinAVR and the Atmel IDE AVR Studio. For Ubuntu linux folks: "sudo apt-get install build-essential avr-libc binutils-avr gcc-avr avrdude"
- Programmer and mega48 pinouts:


Class 1: Programmer Hookup and Hello World LED Blinking
Lecture on how the programmer works -- simple serial interface basics. Some basics on avrdude / GCC tools. Hook up the programming interface wire-by-wire to the Mega48 chip and flash it with a simple program. Then hook up an LED to the output port and watch it blink!
Resources
- Class notes: Media:class1.pdf
- Wiring Diagram:


Homeworks
- Your kit has 10 resistors and 10 LEDs. If you want, you can solder them together to make [AVR: LED Blinkenlights].
- If you didn't already, make labels for the signal wires. Think of an easy way to remember which go where (into the 6-pin or 10-pin header). And/or make permanent programmer "pigtails" by soldering the signal wires to a 2x3 header in the correct orientation (headers available in the HacDC hackersmart for pennies).
- Play around with the delays in the LED_Demo.c code. Make the blinking faster or slower. Experiment with on time and off time.
Class 2: Outputs: Bit Math, Cylon Eyes, and PWM Fading
How to make chips speak to the outside world, pin-by-pin. Enough C bitwise-math operations to make it work. Pulse-width modulation.
Labs: Visualizing bytes, Cylon eyes, and dimming LED's. Extra credit: cross-fading cylon eyes!
Resources
- registers.zip
- cylonEyes.zip
- introPWM.zip
- Class notes: Media:class2.pdf
Homework
- So you can make various lights blink and/or dim. Now what? Cross-fading cylon eyes? Patterns? Something groovy?
- Note that you've got an 8-bit display if you're willing to read out numbers in binary. Useful for debugging later on, for sure. What else? Binary clock? Simple upcounter? Display "random" numbers?
- If you could swing it around, you'd be on your way to a POV toy.
Class 3: Inputs: Buttons
Gather data from the world. The lecture ended up being just on digital input.
Labs: One note organ Media: class3.pdf
Class 4: Inputs: Debouncing and Analog-to-Digital conversion (ADC)
This class, we'll get to debouncing our button input, and reading in continuous voltages
For more info on ADC stuff, see this note
Labs: pushbutton organ, light-dependent theremin.
Media: class4.pdf
Media: debouncedMusicbox.zip
Media: lightDependentTheremin.zip
Class 5: Serial I/O and Interrupts I
Laptop, meet AVR. AVR, laptop. Serial communication (plus serial-to-USB cable) lets you connect your micro to about anything, including your computer. Interrupts let the hardware (pins, serial port, timers, etc) call run functions for you, with the main body of your code picking up where you left off. Combine the two, and you can get pushbutton control of an AVR from your laptop keyboard.
Media: helloSerial.zip
Media: helloInterrupts.zip
Media: class5.pdf
And as a bonus, if you run Python, serialScope.py provides a helpful debugging tool and an example of how simple USB/Serial code can be on the laptop side. Coupled with on-chip ADC, it's a (low speed, sideways) serial oscilloscope. Otherwise, a handy debugging aide.
Homework: Take the scale.h from last class, and using input from your laptop, make a full keyboard out of the AVR plus speaker. Or write a ROT-13 device that takes your input and returns the encoded version.
Class 6: Timers/Counters and Interrupts II
Timers/counters let you do precision things with time. Fix up that nasty audio tone from the LDR theremin. Precise timing allows you to use LED's as light sensors. It's also good for making quality analog output and for directing servo motors. Interrupts + timers = deluxe PWM. Or give your AVR a solid internal timebase. (You know you want to.) In this class, we'll scratch the surface of what you can do with timers.
Media: timerPWM_ctc_hardware_toggle.c
Extra Credit: I2C
Talked a bit about the I2C serial protocol -- a light-weight serial multi-master bus using two wires (plus ground) and capable of addressing 127 different devices. Great for connecting to all sorts of peripherals.
Demoed an $20 I2C 3-axis accelerometer using bare-minimum I2C code, with none of the error-checking that the pro's would do. But it works a charm. That's why it's called hacking, baby!