AVR Microcontroller Class 2009
From HacDC Wiki
Syllabus, course material, homeworks, photos, etc from an Introduction to Microcontrollers with AVR chips class can be found here.
Also see (and contribute to) Useful AVR Links
Class 0: Introduction and Setup
What the AVRs are, what all the pins do, what they can do for you. Then the toolchain: soldering together the programmer kits, getting the software up and running.
Labs: building the kit and running a test LED flasher. (Almost all lab today, little talk.)
Resources:
- Slides from class: Media:class0.pdf
- ATmega48P Datasheets (get both): ATmega48P Summary Datasheet and The Long ATmega48P Datasheet
- Download the software part of the toolchain: For Mac folks: AVR Mac Pack. For Windows folks: WinAVR. For Ubuntu linux folks: "sudo apt-get install build-essential avr-libc binutils-avr gcc-avr avrdude"
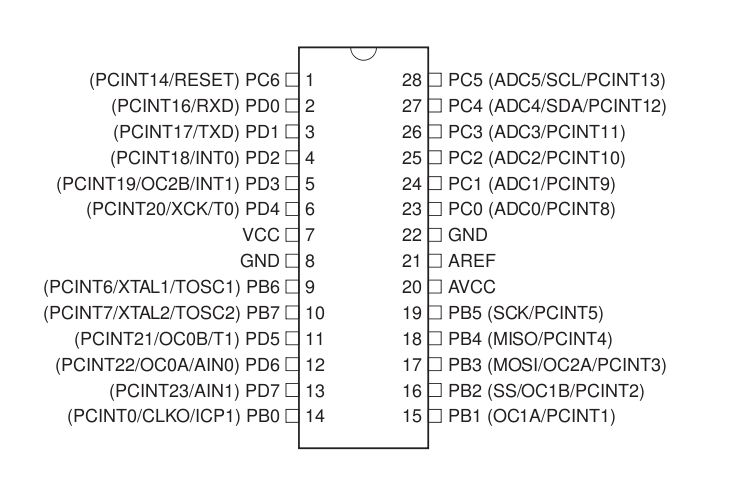
- Programmer and mega48 pinouts:
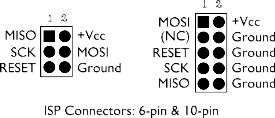


Class 1: Programmer Hookup and Hello World LED Blinking
Lecture on how the programmer works -- simple serial interface basics. Some basics on avrdude / GCC tools. Hook up the programming interface wire-by-wire to the Mega48 chip and flash it with a simple program. The hook up an LED to the output port and watch it blink!
Resources
- Class notes: Media:class1.pdf
- Wiring Diagram:


Homeworks
- Your kit has 10 resistors and 10 LEDs. If you want, you can solder them together to make [AVR: LED Blinkenlights].
- If you didn't already, make labels for the signal wires. Think of an easy way to remember which go where (into the 6-pin or 10-pin header). And/or make permanent programmer "pigtails" by soldering the signal wires to a 2x3 header in the correct orientation (headers available in the HacDC hackersmart for pennies).
- Play around with the delays in the LED_Demo.c code. Make the blinking faster or slower. Experiment with on time and off time.
Class 2: Outputs: Bit Math, Cylon Eyes, and PWM Fading
How to make chips speak to the outside world, pin-by-pin. Enough C bitwise-math operations to make it work. Pulse-width modulation.
Labs: Visualizing bytes, Cylon eyes, and dimming LED's. Extra credit: cross-fading cylon eyes!
Resources
- registers.zip
- cylonEyes.zip
- introPWM.zip
- Class notes: Media:class2.pdf
Homework
- So you can make various lights blink and/or dim. Now what? Cross-fading cylon eyes? Patterns? Something groovy?
- Note that you've got an 8-bit display if you're willing to read out numbers in binary. Useful for debugging later on, for sure. What else? Binary clock? Simple upcounter? Display "random" numbers?
- If you could swing it around, you'd be on your way to a POV toy.
Class 3: Inputs: Buttons
Gather data from the world. The lecture ended up being just on digital input.
Labs: One note organ Media: class3.pdf
Class 4: Inputs: Debouncing and Analog-to-Digital conversion (ADC)
This class, we'll get to debouncing our button input, and reading in continuous voltages
Labs: pushbutton organ, light-dependent theremin.
Class 4: Interrupts and Timers
Interrupts call subroutines when certain conditions are true. Timers let you time stuff. Together, they take a lot of the programming burden off your shoulders, and enable really cool stuff.
Labs: Driving servo motors and/or build a better audio synth, use an LED as a light-source and light-sensor. Extra credit: capacitive touch-switch!
Class 5: Serial I/O
Make the micro speak to your computer (and vice-versa). We can also cover other serial protocols (I2C, SPI).
Labs: Basic serial in/out, data-logging light sensor. Maybe SD/MMC cards? Extra credit: ADC + serial output + Python + laptop = ghetto oscilloscope.