OpticalTableRobot: Difference between revisions
From HacDC Wiki
No edit summary |
No edit summary |
||
| Line 46: | Line 46: | ||
=Safety= | =Safety= | ||
Usual safety precautions apply. | Usual safety precautions apply. | ||
ClassIV lasers can typically cause catastrophic retina damage will instantly upon viewing the projected spot. Ideally, a 'defense-in-depth' approach should be taken combining safety glasses and guards at all times. | |||
Somewhat less true of CO2 lasers, as the far-infrared wavelength cannot be focused by the lens in human eyes. Nonetheless, polycarbonate safety glasses should be used, and walls should be in place to keep the collimated beam on the table. | |||
=Assembly= | =Assembly= | ||
# Fix the policy around the basement so volunteers can work with less politics. | |||
# Replace the tube. Maybe try a cheap, expendable tube for the first few hundred hours. | |||
# Stiffen the joints between axes. Not essential, but nice. | |||
# Add OctoPi or similar web interface, for usability. | |||
# Add walls for safety, to keep the collimated beam on the table. | |||
# Add an acrylic lid, again for safety. | |||
For | ==Upgrades== | ||
For absolute maximum performance, consider the following upgrades. | |||
* Interferometric linear optical encoders. | * Interferometric linear optical encoders. | ||
* Vectran rope timing belt replacements. | * Vectran rope timing belt replacements. | ||
* | * Angle iron brackets reinforced by welded plate. | ||
==Troubleshooting== | ==Troubleshooting== | ||
Revision as of 16:54, 11 January 2016
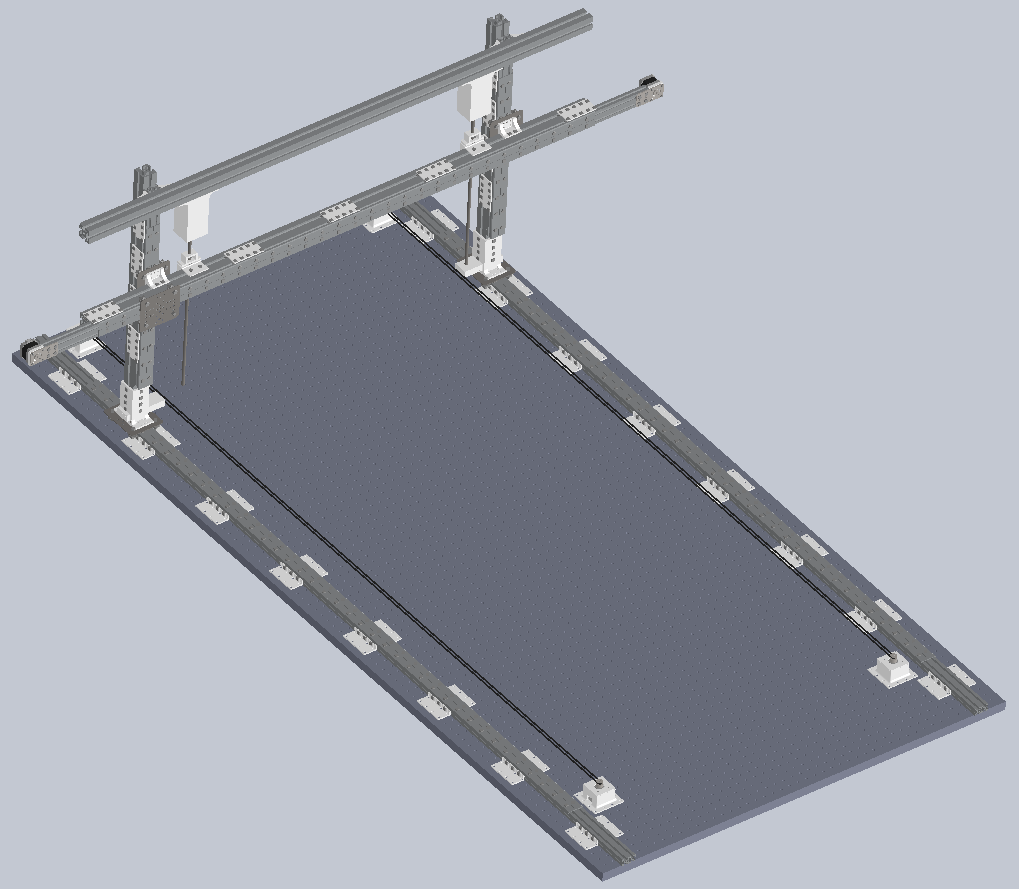
Multi-tool CNC platform in progress atop the optical table to enable ultra-precise fabrication on a massive scale. Derived from FlexReplicator. Tool compatible with FlexReplicator, TazMega, TazStiff, MightyTool, and related projects.
This is the kind of machine one might use to laser cut giant tractor parts, 3D print large herringbone power transmissions for lost PLA casting, or carry out a VLSI production run. Or of course, typical laser paper cutting.
Status
Assembled and operational.
Features
- Approximately 7'x2'x1.5' build area.
- Built on 100W Laser Cutter (tube down ATM).
- Rock-solid, supported by optical table and 40 series extrusions.
- Supports multiple tools and capabilities, starting with 3D printing and Laser Cutting.
- Simultaneous multi-tool use will enhance utility, such as milling down 3D printed layers.
Documentation
- Part of design hosted on github.
- Rest of design hosted at The FossCar Project.
Tools
IR Laser
Tested. Mirrors are in place, but laser tube has died.
Extruders
In progress. Works just like any other 3D printer. Plan on at least two nozzles, one for high-precision (<0.35mm), one for high-speed (>1mm).
Mill
In progress. Standard 120V AC drill, connected to control circuitry by SSR.
Pick And Place
In Progress. camera system, part feeders, and vacuum based pick up and rotate tool will need to be added.
VLSI Projection Lithography
In progress. Modified (ultraviolet) DLP projector and camera mounted to microscope, used for high-resolution patterning. Absolute accuracy (inter-frame) is expected to be ~2um, while relative accuracy (intra-frame) is expected to be <0.5um, scalable down to diffraction-limited performance.
Casting
Direct metal printing thus far is either highly expensive, low-strength, or both. Compromise is to 3D print a plastic (PLA) part, then cast it to metal. Besides low cost, this process can be used to achieve parts traditionally infeasible, like pre-assembled herringbone-gear power transmissions.
Pricing
As with other HacDC tools, operators are asked to pay for consumables used only for heavy usage. However, this machine can easily consume a few hundred dollars of filament in one job...
Safety
Usual safety precautions apply.
ClassIV lasers can typically cause catastrophic retina damage will instantly upon viewing the projected spot. Ideally, a 'defense-in-depth' approach should be taken combining safety glasses and guards at all times.
Somewhat less true of CO2 lasers, as the far-infrared wavelength cannot be focused by the lens in human eyes. Nonetheless, polycarbonate safety glasses should be used, and walls should be in place to keep the collimated beam on the table.
Assembly
- Fix the policy around the basement so volunteers can work with less politics.
- Replace the tube. Maybe try a cheap, expendable tube for the first few hundred hours.
- Stiffen the joints between axes. Not essential, but nice.
- Add OctoPi or similar web interface, for usability.
- Add walls for safety, to keep the collimated beam on the table.
- Add an acrylic lid, again for safety.
Upgrades
For absolute maximum performance, consider the following upgrades.
- Interferometric linear optical encoders.
- Vectran rope timing belt replacements.
- Angle iron brackets reinforced by welded plate.
Troubleshooting
When troubleshooting precision errors and planning upgrades, it is helpful to review the most likely causes.
- Inadequate or excessive wheel pressure (check eccentric spacers).
- Poor alignment along axes with multiple drivers.
- Twisting at or near linear motion carriages.
- Backlash at boots joining X and Z axes.
- Separation between highly stiff (table, 40 series extrusions) and less stiff (20 series extrusions) materials.
- Warping of stiff materials (should not ever occur, would imply gross overloading and abuse exceeding several hundred pounds force).
This category currently contains no pages or media.

