RostockMax: Difference between revisions
From HacDC Wiki
Ubuntourist (talk | contribs) (Cura patch) |
|||
| (29 intermediate revisions by 4 users not shown) | |||
| Line 1: | Line 1: | ||
[[Category:3D_Printing]] | [[Category:3D_Printing]] | ||
[[Category:Equipment]] | [[Category:Equipment]] | ||
[[Category:3D_Printers]] | |||
Using the [http://reprap.org/wiki/Rostock_MAX Rostock MAX] | |||
=Current Machine Status= | =Current Machine Status= | ||
Functional, but with sizing issues. Items printed on it are not quite the right size, and adjusting the bed height causes PROBLEMS. the bed is NOT heated. | |||
=General Info= | |||
Model: SeeMeCNC Rostock MAX V2 | |||
=Operation= | =Operation= | ||
==Patching Cura== | |||
As of 2018.11.29, there is a bug in the Lulzbot edition of Cura installed on the classroom laptops that prevents it from working properly with the RostockMax. To fix it, edit <code>/usr/share/cura/Cura/util/sliceEngine.py</code> and change | |||
<pre> pos += (objMin + objMax) / 2.0 * 1000 | |||
to | |||
pos = numpy.add(pos, (objMin + objMax) / 2.0 * 1000) | |||
</pre> | |||
(This occurs at approximately line 359.) | |||
'''NOTE: The laptop computers use an OLDER version of the Lulzbot Cura. Newer versions require capabilities that the old classroom machines cannot master.''' | |||
==Set Up== | |||
In order to use the 3D printer, you will need to make sure the computer has the correct firmware to work with the 3D printer. In this case the file can be found at:https://github.com/kliment/Printrun. I used clone to get this firmware. After the firmware is downloaded, you will need to find out how tall the 3D printer is. In this case, I cd'd into the file and typed ./pronterface.py to pull up an control program interface. Then press the connect button. | |||
If you get the error [ERROR] Could not connect to /dev/ttyACM0 at baudrate 115200: | |||
Serial error: could not open port /dev/ttyACM0: [Errno 13] Permission denied: '/dev/ttyACM0' you will need to add yourself to the dialout group. | |||
If you don't have this problem skip this portion and continue with the set up. | |||
If you have this problem use this command, sudo usermod -a -G dialout hacdc. | |||
You will then have to log out and sign back in. You can type groups in a terminal to verify that this command worked. Pull up the control program interface again and press connect. After the printer connects, press the Z home button in the top right corner of the large circle. This will bring the printer arms to the top of the printer. You will then have to slowly press -z to find out how tall the machine is. Start by pressing the 10 button until you get close to the bottom. When you get close to the bottom, decrease how much you are going down to 1. Place a piece of paper between the printer head and the printer base. As you get closer to the bottom, move the paper in between each movement. When the paper stops moving easily, you have found your hight. The number will be found in the text window on the side of the control program interface. | |||
At this point I discovered that one of the buttons on the control panel didn't work. I wasn't sure if this was a software or hardware problem. I decided to see if I could figure it out by looking at the software. I pulled up the SeeMeeCNC website and found the printer firmware. This is the link: https://github.com/seemecnc/Firmware. I then cloned the software onto the computer. | |||
I pulled up arduino and work on setting it up. Under the tools menu go to board and click on Arduino Mega 2560 or Mega ADK. Then under the same menu go to serial port and choose your port. Then go to file and click on open. Find your firmware. For me it was under Firmware/Repetier Firmware/Repetier/Repetier.ino | |||
This will pull the code up in the arduino. I then tried to up load it. When it finished uploading the screen of the printer showed gobble-de-gook. I turned the printer off and back on again. The screen showed that the printer thought it was the Rostock Max v3 instead of the Rostock Max v2. I went to the configuration.h and change the settings to show that I was using the Rostock Max v2. I uploaded the code again. The screen still showed gobble-de-gook. | |||
After much seaching, I learned that it was probably an compiler issue. I tried to update the arduino. I needed version (1.8.4) or later but after struggling to get the program to update, I decided to come back to this at another time. | |||
After much more work I learned that the problem was that the connector (labeled B) to the control panel was backwards. When I changed the direction that the cord was plugged in, the screen worked and the turny knob worked. | |||
g-codes to type into pronterface | |||
http://reprap.org/wiki/G-code | |||
==Firing Up== | ==Firing Up== | ||
#Go through the routine maintenance list as necessary, especially the safety section. | #Go through the [[#Routine Maintenance - ALWAYS CHECK|routine maintenance list]] as necessary, especially the safety section. | ||
#Ensure power is available (ie. turn on the nearby power strip, etc). | #Ensure power is available (ie. turn on the nearby power strip, etc). | ||
#Open Pronterface. Start heating the glass bed if you don't want to wait later. | #Open [https://github.com/kliment/Printrun/blob/master/README.md Pronterface]. Start heating the glass bed if you don't want to wait later. | ||
==File Preparation== | ==File Preparation== | ||
#Load an STL model onto the dedicated laptop for printing. If you haven't made one, download one from [http://www.thingiverse.com/ Thingiverse]. | #Load an STL model onto the dedicated laptop for printing. If you haven't made one, download one from [http://www.thingiverse.com/ Thingiverse]. | ||
#On rare occasion, it is necessary to clean the STL model, or align it to the print surface. In [http://www.netfabb.com/stl_repair_fixing.php Nefabb], click the red "+", "Automatic repair", "Default repair", "Apply repair", "Yes" - remove old part. Finally, export part as STL, repairing more errors if prompted. | #On rare occasion, it is necessary to clean the STL model, or align it to the print surface. In [http://www.netfabb.com/stl_repair_fixing.php Nefabb], click the red "+", "Automatic repair", "Default repair", "Apply repair", "Yes" - remove old part. Finally, export part as STL, repairing more errors if prompted. | ||
#Open Slic3r. Load the STL file. | #Open [http://manual.slic3r.org/ Slic3r]. Load the STL file. | ||
#Recommended print settings: "PLA (Cheap)" "Filament: PLA" "Printer: PLA" . Change these if necessary (eg. strong mechanical parts need more infill). | #Recommended print settings: "PLA (Cheap)" "Filament: PLA" "Printer: PLA" . Change these if necessary (eg. strong mechanical parts need more infill). | ||
#Export G-Code in Slic3r. | #Export G-Code in Slic3r. | ||
| Line 24: | Line 58: | ||
=Tips= | =Tips= | ||
Instead of using Proterface, consider just copying the G-Code to the SD card, and using the LCD interface only. | *Instead of using Proterface, consider just copying the G-Code to the SD card, and using the LCD interface only. | ||
*Unusually high temperatures are required to compensate limited extruder pressure and heatbed efficiency. For PLA, 198degC extrusion and 120degC heatbed temperatures seem appropriate and normal. For ABS, 230-250degC extrusion and 140degC heatbed temperatures may be normal. | |||
=Routine Maintenance - ALWAYS CHECK= | =Routine Maintenance - ALWAYS CHECK= | ||
==FIRE HAZARDS== | ==FIRE HAZARDS== | ||
*Leaving the printer operating unattended is not recommended, especially for new users unfamiliar with the technology. We do not yet have a long track record with this machine. | *Leaving the printer operating unattended is not recommended, especially for new users unfamiliar with the technology. We do not yet have a long track record with this machine. | ||
*Turn off both the printer and 24v Heatbed PSU before leaving. | *Turn off both the printer and 24v Heatbed PSU before leaving, using the dedicated power strip. | ||
*Watch the machine closely during startup, at the beginning of jobs, and other critical times, when uncontrolled heating might occur. | |||
==Bed Cleaning== | ==Bed Cleaning== | ||
*Bare glass bed must be extremely clean. If bed is level to within 0.15mm, and plastic is not sticking, it needs cleaning. Windex, diswashing soap, razor blades, and elbow grease are appropriate resources. | *Bare glass bed must be extremely clean. If bed is level to within 0.15mm, and plastic is not sticking, it needs cleaning. Windex, diswashing soap, razor blades, and elbow grease are appropriate resources. | ||
* | *Elmer's disappearing purple, certain hairspray, certain diluted glues, and poly-vinyl acetate generally have been reported to improve adhesion in some cases. Remember to dissolve this material in water to remove completed parts. Also please note any usage of such adhesion aids in the operator's log so we can determine why they were necessary. | ||
==Leveling== | ==Leveling== | ||
===Tips=== | ===Tips=== | ||
* Specialized G-Code is needed test nozzle height at each tower, as documented in the manual. | * Specialized G-Code is needed test nozzle height at each tower, as documented in the manual. | ||
* Buttons are available in pronterface for 'tower1', 'tower2', 'tower3' and 'center'. (If you do not see the buttons on pronterface you will need to add them manually. To do this you will need to press the add custom new button. You will need to add several buttons. Let’s call the three tower locations A, B, and C, and the center D. The script code for each is: | |||
Button Script | |||
A g28 g0 f8000 x-77.94 y-45 z0 | |||
B g28 g0 f8000 x77.94 y-45 z0 | |||
C g28 g0 f8000 x0 y90 z0 | |||
D g28 g0 f8000 x0 y0 z0 | |||
After you make these buttons, make sure to home the printer before using the buttons.) | |||
* Horizontal radius can be set with the following, where 128.850 is the desired value: M206 T3 P855 X128.850 | * Horizontal radius can be set with the following, where 128.850 is the desired value: M206 T3 P855 X128.850 | ||
* Use paper sheets to measure gap between nozzle and glass. | * Use paper sheets to measure gap between nozzle and glass. | ||
| Line 45: | Line 89: | ||
* The plastic delta arms are primarily responsible for loss of alignment, so any external forces placed on the extruder platform may force re-calibration. | * The plastic delta arms are primarily responsible for loss of alignment, so any external forces placed on the extruder platform may force re-calibration. | ||
* Multiple rounds of adjustment will be required, as delta bot geometry is interdependent. Do not attempt perfect alignment in one step. | * Multiple rounds of adjustment will be required, as delta bot geometry is interdependent. Do not attempt perfect alignment in one step. | ||
* With practice, perfect calibration can be achieved in about | * With practice, perfect calibration can be achieved in about 5 minutes. | ||
If you don't quite understand the above instructions here are some more in depth instructions. After I created the buttons (as shown above) I now needed to actually level the printer. To do this I first pressed on the center button. This brought the printer tip down to the center of the printer. I then pressed one of the tower buttons. The printer moved the tip to in front of one of the towers. While it moved it went up just slightly as it moved. In order to fix this problem I went and adjusted the horizontal radius. In between adjustments it was necessary to store the changes to the EEPROM. I would then home the printer and try again. When I got this in the correct position, I then used a piece of paper to check the height. If at one of the towers the paper didn't move freely I went to the level adjustment screw for that tower and turned it slightly. I would then home the printer, click the center button, than each of the tower buttons testing each with the paper as I went. I did this until all of the tower were about the same height. | |||
===Process=== | ===Process=== | ||
| Line 62: | Line 106: | ||
=Please Avoid= | =Please Avoid= | ||
You are adding to the workload on a shared machine. Please be gentle. | You are adding to the workload on a shared machine. Please be gentle. | ||
*Avoid fouling the glass bed, which must be absolutely clean for adhesion. | |||
*Bed temperatures above 120degC should not be needed for PLA. | |||
*Don't crash the Z-Axis into the glass surface, it will shatter. | *Don't crash the Z-Axis into the glass surface, it will shatter. | ||
*Removing parts from glass bed before cooling completes, or getting fingers on the bed leaves residue and necessitates cleaning or worse. | *Removing parts from glass bed before cooling completes, or getting fingers on the bed leaves residue and necessitates cleaning or worse. | ||
| Line 83: | Line 129: | ||
=Improvements= | =Improvements= | ||
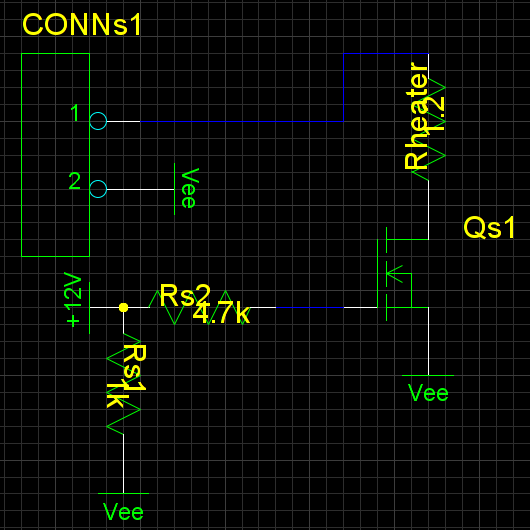
==24v PSU== | |||
Design files are stored at HacDC's github repository. | |||
https://github.com/HacDC/RostockMax/tree/master/PSU | |||
[https://raw.githubusercontent.com/HacDC/RostockMax/master/PSU/Schematic/RostockMax24vPSU.sch.png Schematic] | |||
[https://raw.githubusercontent.com/HacDC/RostockMax/master/PSU/BOM.txt BOM] | |||
Internal 12V operation is still possible, and will be connectorized soon. | |||
Latest revision as of 01:41, 30 November 2018
Using the Rostock MAX
Current Machine Status
Functional, but with sizing issues. Items printed on it are not quite the right size, and adjusting the bed height causes PROBLEMS. the bed is NOT heated.
General Info
Model: SeeMeCNC Rostock MAX V2
Operation
Patching Cura
As of 2018.11.29, there is a bug in the Lulzbot edition of Cura installed on the classroom laptops that prevents it from working properly with the RostockMax. To fix it, edit /usr/share/cura/Cura/util/sliceEngine.py and change
        pos += (objMin + objMax) / 2.0 * 1000
to
        pos = numpy.add(pos, (objMin + objMax) / 2.0 * 1000)
(This occurs at approximately line 359.)
NOTE: The laptop computers use an OLDER version of the Lulzbot Cura. Newer versions require capabilities that the old classroom machines cannot master.
Set Up
In order to use the 3D printer, you will need to make sure the computer has the correct firmware to work with the 3D printer. In this case the file can be found at:https://github.com/kliment/Printrun. I used clone to get this firmware. After the firmware is downloaded, you will need to find out how tall the 3D printer is. In this case, I cd'd into the file and typed ./pronterface.py to pull up an control program interface. Then press the connect button. If you get the error [ERROR] Could not connect to /dev/ttyACM0 at baudrate 115200: Serial error: could not open port /dev/ttyACM0: [Errno 13] Permission denied: '/dev/ttyACM0' you will need to add yourself to the dialout group. If you don't have this problem skip this portion and continue with the set up. If you have this problem use this command, sudo usermod -a -G dialout hacdc. You will then have to log out and sign back in. You can type groups in a terminal to verify that this command worked. Pull up the control program interface again and press connect. After the printer connects, press the Z home button in the top right corner of the large circle. This will bring the printer arms to the top of the printer. You will then have to slowly press -z to find out how tall the machine is. Start by pressing the 10 button until you get close to the bottom. When you get close to the bottom, decrease how much you are going down to 1. Place a piece of paper between the printer head and the printer base. As you get closer to the bottom, move the paper in between each movement. When the paper stops moving easily, you have found your hight. The number will be found in the text window on the side of the control program interface. At this point I discovered that one of the buttons on the control panel didn't work. I wasn't sure if this was a software or hardware problem. I decided to see if I could figure it out by looking at the software. I pulled up the SeeMeeCNC website and found the printer firmware. This is the link: https://github.com/seemecnc/Firmware. I then cloned the software onto the computer. I pulled up arduino and work on setting it up. Under the tools menu go to board and click on Arduino Mega 2560 or Mega ADK. Then under the same menu go to serial port and choose your port. Then go to file and click on open. Find your firmware. For me it was under Firmware/Repetier Firmware/Repetier/Repetier.ino This will pull the code up in the arduino. I then tried to up load it. When it finished uploading the screen of the printer showed gobble-de-gook. I turned the printer off and back on again. The screen showed that the printer thought it was the Rostock Max v3 instead of the Rostock Max v2. I went to the configuration.h and change the settings to show that I was using the Rostock Max v2. I uploaded the code again. The screen still showed gobble-de-gook. After much seaching, I learned that it was probably an compiler issue. I tried to update the arduino. I needed version (1.8.4) or later but after struggling to get the program to update, I decided to come back to this at another time. After much more work I learned that the problem was that the connector (labeled B) to the control panel was backwards. When I changed the direction that the cord was plugged in, the screen worked and the turny knob worked.
g-codes to type into pronterface http://reprap.org/wiki/G-code
Firing Up
- Go through the routine maintenance list as necessary, especially the safety section.
- Ensure power is available (ie. turn on the nearby power strip, etc).
- Open Pronterface. Start heating the glass bed if you don't want to wait later.
File Preparation
- Load an STL model onto the dedicated laptop for printing. If you haven't made one, download one from Thingiverse.
- On rare occasion, it is necessary to clean the STL model, or align it to the print surface. In Nefabb, click the red "+", "Automatic repair", "Default repair", "Apply repair", "Yes" - remove old part. Finally, export part as STL, repairing more errors if prompted.
- Open Slic3r. Load the STL file.
- Recommended print settings: "PLA (Cheap)" "Filament: PLA" "Printer: PLA" . Change these if necessary (eg. strong mechanical parts need more infill).
- Export G-Code in Slic3r.
- Print G-Code in Pronterface. SD Card printing highly recommended.
Printing
- With luck, printing should commence autonomously without flaws. Two common problems are inadequate adhesion (resolved by print surface cleaning and possibly hairspray) or bed alignment (resolved through a rather complex alignment process). See the routine maintenance section.
- Wait for bed to cool. Part should lift right off the bed once cool. If not, apply gentle hammer taps with sharp pointy tool to the base of your object. After a few gentle taps in various places, it will pop off the bed cleanly. Carefully, please avoid chipping or cracking the glass.
Tips
- Instead of using Proterface, consider just copying the G-Code to the SD card, and using the LCD interface only.
- Unusually high temperatures are required to compensate limited extruder pressure and heatbed efficiency. For PLA, 198degC extrusion and 120degC heatbed temperatures seem appropriate and normal. For ABS, 230-250degC extrusion and 140degC heatbed temperatures may be normal.
Routine Maintenance - ALWAYS CHECK
FIRE HAZARDS
- Leaving the printer operating unattended is not recommended, especially for new users unfamiliar with the technology. We do not yet have a long track record with this machine.
- Turn off both the printer and 24v Heatbed PSU before leaving, using the dedicated power strip.
- Watch the machine closely during startup, at the beginning of jobs, and other critical times, when uncontrolled heating might occur.
Bed Cleaning
- Bare glass bed must be extremely clean. If bed is level to within 0.15mm, and plastic is not sticking, it needs cleaning. Windex, diswashing soap, razor blades, and elbow grease are appropriate resources.
- Elmer's disappearing purple, certain hairspray, certain diluted glues, and poly-vinyl acetate generally have been reported to improve adhesion in some cases. Remember to dissolve this material in water to remove completed parts. Also please note any usage of such adhesion aids in the operator's log so we can determine why they were necessary.
Leveling
Tips
- Specialized G-Code is needed test nozzle height at each tower, as documented in the manual.
- Buttons are available in pronterface for 'tower1', 'tower2', 'tower3' and 'center'. (If you do not see the buttons on pronterface you will need to add them manually. To do this you will need to press the add custom new button. You will need to add several buttons. Let’s call the three tower locations A, B, and C, and the center D. The script code for each is:
   Button                Script
   A                      g28 g0 f8000 x-77.94 y-45 z0
   B                      g28 g0 f8000 x77.94 y-45 z0
   C                      g28 g0 f8000 x0 y90 z0
   D                      g28 g0 f8000 x0 y0 z0
After you make these buttons, make sure to home the printer before using the buttons.)
- Horizontal radius can be set with the following, where 128.850 is the desired value: M206 T3 P855 X128.850
- Use paper sheets to measure gap between nozzle and glass.
- Gap should be 0.15mm across the entire glass surface, exact to +/-0.03mm.
- Warping is not known to occur with this particular print surface, so radical modifications should not be necessary. Do not attempt replacement without a second expert opinion.
- Exact alignment is possible, and well worth the hassle. Less accurate alignment quickly leads to major print errors (particularly loss of adhesion).
- The plastic delta arms are primarily responsible for loss of alignment, so any external forces placed on the extruder platform may force re-calibration.
- Multiple rounds of adjustment will be required, as delta bot geometry is interdependent. Do not attempt perfect alignment in one step.
- With practice, perfect calibration can be achieved in about 5 minutes.
If you don't quite understand the above instructions here are some more in depth instructions. After I created the buttons (as shown above) I now needed to actually level the printer. To do this I first pressed on the center button. This brought the printer tip down to the center of the printer. I then pressed one of the tower buttons. The printer moved the tip to in front of one of the towers. While it moved it went up just slightly as it moved. In order to fix this problem I went and adjusted the horizontal radius. In between adjustments it was necessary to store the changes to the EEPROM. I would then home the printer and try again. When I got this in the correct position, I then used a piece of paper to check the height. If at one of the towers the paper didn't move freely I went to the level adjustment screw for that tower and turned it slightly. I would then home the printer, click the center button, than each of the tower buttons testing each with the paper as I went. I did this until all of the tower were about the same height.
Process
- If alignment may be far off (ie. major maintenance has been performed on the machine), set the Z0 coordinate at least 3mm away from the surface.
- Move nozzle to the first tower. Adjust nozzle height by turning the carriage-mounted limit switch adjustment screw slightly (<1/4 turn).
- Repeat as necessary to approximately align the gap between nozzle and glass.
- Make one alignment round through all three towers, proceeding clockwise.
- Check the center alignment. Increase the horizontal radius EEPROM setting by 0.5mm if higher than the edges, decrease if lower.
- Repeat the above two steps. After the first 4-5 passes, only very fine adjustments should be needed. Just 10 passes should suffice for perfect alignment.
- Move to center, set the Z0 coordinate just 0.15mm above the surface. Check one more time for an equal gap at all tower positions.
Support
While this process is far superior to the temperamental compression screws and free-floating PCB heaters used on most 3D printers, it still takes practice. Newcommers considering these steps should contact experts like juri and mirage335 at HacDC's IRC channel.
Please Avoid
You are adding to the workload on a shared machine. Please be gentle.
- Avoid fouling the glass bed, which must be absolutely clean for adhesion.
- Bed temperatures above 120degC should not be needed for PLA.
- Don't crash the Z-Axis into the glass surface, it will shatter.
- Removing parts from glass bed before cooling completes, or getting fingers on the bed leaves residue and necessitates cleaning or worse.
- Try not to touch the extruder platform or plastic arms, as this may force recalibration.
- Operation from battery backup and SD card strongly recommended for reliability.
Documentation
Software load is hosted on github. Additionally, SeeMeCNC provides a detailed construction/user manual.
Pricing
Free of charge for dues-paying members using reasonable quantities of filament (<0.5kG or <50m per month average).
Newcomers to the space are freely invited to lightly use the 3D printer use for small projects, or education.
Non-members regularly using the 3D printer are politely requested to donate approximately $0.50 per meter of filament, as estimated by pronterface when loading g-code.
If the printer breaks dramatically while you are using it, don't fret. We have replacement parts, budget, and talent to repair it.
These supplies and others, are funded by membership dues when revenue exceeds operating expenditures (ie. rent), according to Project Awesome rules.
Improvements
24v PSU
Design files are stored at HacDC's github repository. https://github.com/HacDC/RostockMax/tree/master/PSU Schematic BOM
Internal 12V operation is still possible, and will be connectorized soon.
Pages in category "RostockMax"
The following 2 pages are in this category, out of 2 total.